 Thaka.Ai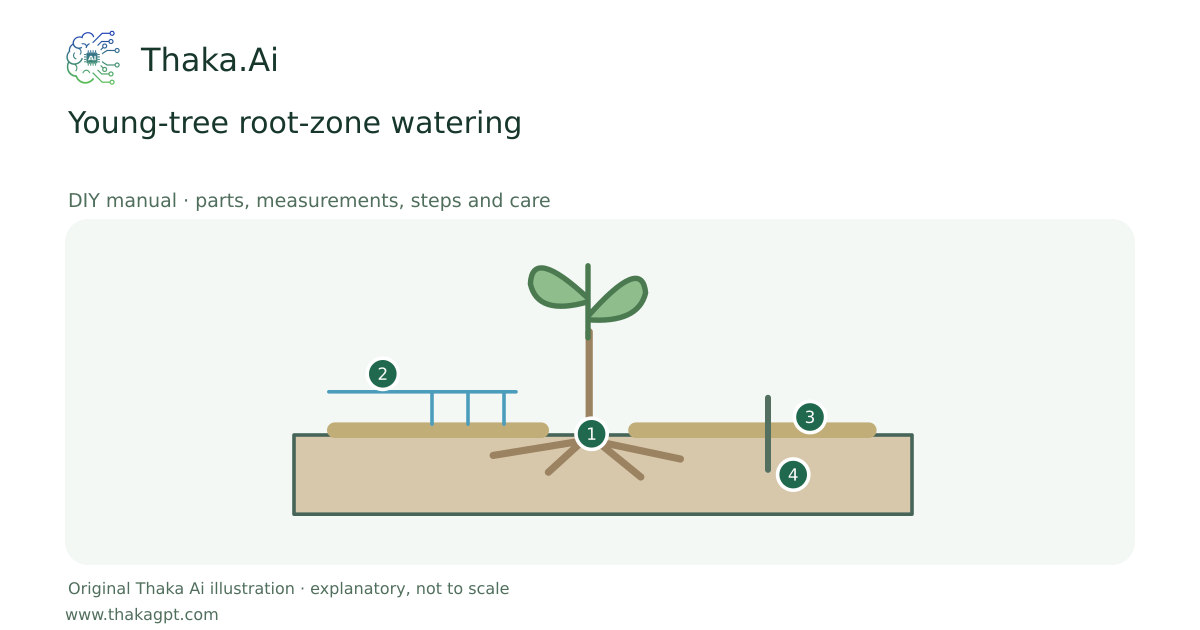
Reviewed 17 October 2026 · schematic not to scale
Apply slow surface water across the actual root zone. This is the practical alternative to copying a buried fertiliser pipe from the reference.
- 1Keep the root flare visible
- 2Water the root ball and surrounding soil slowly
- 3Mulch with a gap around the trunk
- 4Measure shallow root-zone moisture; expand the area
Site and operating requirements
- Identify crop, season, water quality, soil/medium and local heat. Measure materials before cutting and confirm support and drainage.
Tools and measuring equipment
- Watering hose or basin outlet, moisture probe/trowel, tape and a measured water container; no blind root drilling.
Output and operating conditions
A measured surface-root watering plan, with mulch and observed soil moisture.
An optional 80–100 mm soil berm and about 75 mm mulch are source examples. Watering volume and frequency depend on soil, drainage, tree size and weather; no universal litres/day.Parts, quantities and dimensions
| Part | Quantity | Specification / dimensions |
|---|---|---|
| Slow watering supply | 1 | Clean suitable irrigation water, hose trickle or a matched surface drip arrangement covering root ball and backfill. |
| Clean mulch and hand tools | 1 set | Clean organic mulch, trowel/moisture probe, gloves and ruler; keep root flare exposed. |
| Moisture and watering log | 1 | Record checked depth, root-ball/backfill moisture, duration, weather and plant response. |
Preparation and component checks
- Read the size notes first. Measure the purchased parts and label every piece before making any cut or hole. Keep access and cleaning space clear.
- Gather the whole shopping list, dry-fit where applicable and keep the complete linked source at hand. Source dimensions and original sizing examples are identified separately.
Procedure
- 1
Locate the root ball and backfill without cutting roots. Check planting depth and drainage before adding water.
- 2
Water slowly over both areas immediately after planting. Do not pool water continuously against the trunk.
- 3
Where useful, form a low berm at the watering-area edge rather than piling soil onto the trunk.
- 4
Add mulch with a clear gap around trunk/root flare. Keep emitters visible enough to inspect.
- 5
Check moisture frequently during establishment; a source reference checks around 150 mm depth. Water when needed, then confirm drainage.
- 6
Expand the wetted area as roots spread. Move/add emitters instead of forever watering only one point near the trunk.
- 7
Use soil testing and crop advice for nutrients. Do not pour concentrated fertiliser into a narrow buried pipe.
Ready-to-use checklist
- Moisture reaches the root ball and surrounding soil without prolonged saturation; changes are based on observation.
- All edges, supports, drainage and access have been checked. Unknown critical specifications have been resolved before use.
Safety and inspection
Use the specified materials and complete source method. Ask a competent local specialist where site loads, electricity, water safety or unfamiliar tools are involved.
Verify the result
Moisture reaches the root ball and surrounding soil without prolonged saturation; changes are based on observation.
Measurement log
- Date, actual dimensions, material/product labels, water/soil readings, actions, problems and results. Photograph the setup before use and after any change.
Maintenance and repeat checks
- Compare root-ball and surrounding-soil moisture; one can remain dry while the other is wet. Repair blocked emitters.
- Avoid persistent puddling, mulch against the trunk and digging through established roots.
Troubleshooting
- Unexpected decline, pests, odour, poor growth or animal distress
- Pause the affected activity, separate suspect material and check the guide’s moisture, heat, hygiene, drainage and care requirements. Get a qualified diagnosis before treatment or reuse.